Well I've finally accomplished the task of creating & designing a card, and taking photos along the way, so that I can do my very first card tutorial. YAY!
Here is the completed card...

Easy-peasy Directions:
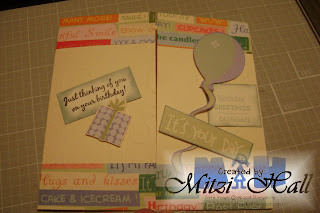
1. Assemble pieces needed. (I stamped and pre-cut the paper in the picture below).
* 6" x 12" piece of neutral (or colour of choice) Cardstock.
* 6" x 12" piece of neutral (or colour of choice) Cardstock.
* 6" x 6" piece of patterned paper.
* 1&1/8" x 3" piece of patterned paper (x4)
* Embosser of choice (Big Shot, Cutterbug, Sizzix, Paper Crimper, etc)
* 26" of Ribbon of choice
* Ink: I used 'Versafine Onyx Black' & 'Stampin' Up - Soft Sky'
* Stamp sets: Stamp sets I used; On Your Birthday, Seeing Spots,
* Card Embellishments - Brads, eyelets, etc. I used 'Colorbok Card Embellishments - Bright Metal Dots'
* Punch-out Paper Embellishments, or stickers of choice that match theme of card.
* Adhesive: Tape or Glue (whatever you choose - I'm a tape girl)
* Pop-dots (or whatever brand of pop-up adhesive you use)
* Sponge Dauber
* Stampin' Up Markers (or markers of choice)
* Paper Cutter of choice, and Scor-Pal (or score tool of some kind)

2. Cut a 12" x 12" piece of neutral (or colour of choice) Cardstock in 1/2. (Leaving you two pieces that are 6" x 12"). Take one, and run it through an Embosser of choice (IE. Big Shot, Cutterbug, Sizzix, etc), I used a 'Marvy Paper Crimper/Embosser'.

3. Take one of the CS pieces, and score at 3" and 9". (or 3" at both sides). Fold in like a gate-fold card. I guess it's more of a gate-fold card than a tri-fold card... but either way it's cute.

4. Take the 4 pieces of 1&1/8" x 3" patterned paper, and attach them to the tops and bottoms of the gate-folds as shown in the pic below.

5. Attach other embellishments, stamped CS to the front of card as desired. I sponged/distressed the edges of my stamped CS with Soft Sky before attaching.
6. Open the card. Attach the 26" piece of ribbon to the inside of card (only in the 6" x 6" square - not on the folds). (Step I forgot in my putting together of the card - but it was in the plans. My card still worked as you will see in the pics later, as I added another piece of the patterned paper on top of the ribbon. But you can skip this step if desired, if you want the ribbon showing when they open the card.)

7. Attach the 6" x 6" piece of patterned paper to the centre of the card. (between the score lines basically). (If I did the 6th step above, the ribbon would be hanging out from under the patterned paper in the pic below. OOPS.)

8. I used the sponge dauber again to distress the stamped piece of white CS, and then I attached it to the centre of the patterned paper.

 Here's the proper shot after these steps... ribbon is under the patterned paper. I just cut a small piece of the left-over patterned paper to fit under the stamped CS image, and taped it over top of the ribbon. (You can't tell from the pic below.) Make sure the ribbon is out long enough on the sides for it to tie equally.
 Close-up view...
 9. Make a small slit where the arrow is on the pic below, and slide the ribbon through it to the other side. Make a slit on both sides of the 6" x 6" patterned paper, where the ribbon is to go through.
 Here's my pic of before the extra piece of patterned paper was attached, so you can see the ribbon going through the CS. (pic below)
Here's the correct pic, where the patterned paper is over top of the ribbon, and the ribbon is going through the CS.
 10. Attach more embellishments, like punch-out paper embellishments, or stickers of your choice on top of the stamped image.
 11. You are almost done! YAY! You can leave the card like this if desired... but I like to add a little sparkle or shine...
 Close-up view to see the paper embellishments are popped-up... and to show the ribbon tyed.
12. I added alphabet & number stickers for the birthday boy... can't believe my honey is 38!

13. I added some 'Colorbok Card Embellishments - Bright Metal Dots' to the outside of the card for some shine... (but you could add brads, or eyelets, or whatever embellishment you choose.)

YAY! That's it! You are done, and have a beautiful card. But obviously a 6" x 6" card is not a normal sized card. I made this one, because I found many large square envelopes in my envelope drawer.
So here's a BONUS item for you... the ENVELOPE! Many people just write the name of the person receiving the card on the outside (if you are just handing it to the person, and not mailing of course)... but the envelope is always an important piece of the card for me! You can decorate it to match the card, or with matching ink.
Here's my fun envelope for my honey... His initials are M.W.H., so I used my sponge dauber, and the Soft Sky ink (which I used on my card) with an alphabet stencil, and stenciled his initials on the envelope. I overlapped them a bit to make it unique.
I used the dotted circle stamp from 'Stampin' Up - Seeing Spots' and Soft Sky and stamped all over the envelope.
 I used a stamp (not used in my card) from the same set (On Your Birthday) and added it to the bottom of the envelope. I used a Stampin' Up marker, 'Certainly Celery' I think, and doodled lines around the M.W.H.
HAVE FUN! Remember to STAMP OUT THE DEVIL!


No comments:
Post a Comment